
Quick summary, we think that the StrelokPRO Kestrel D3 Drop combination is currently the best beginners/medium range hunters ballistic app and environment meter system on the market right now. Despite the slightly counter intuitive guided user interface of StrelokPRO (e.g. load and bullet selections at the bottom of the screen w.t.f?), it is easy to use once familiar and it seamlessly integrates with the affordable D3 Drop (a device people generally forget is hanging on their backpack) to yield precise ballistic solutions that consider all the critical environmental conditions, at your exact location without requiring mobile reception. All you have to do is estimate the wind and lets be honest, when your shooting from dense overgrowth up onto an exposed hill at a Sambar or running between barricades for a hasty shot off a moving platform, the wind call isn’t likely to be the main factor to cause a miss. StrelokPRO also has the best reticle database as far as we can tell and it is regularly updated, so when your starting out or hunting without exposed turrets, StrelokPro will almost certainly have your ret and be able to generate your exact holdovers for your current conditions.
Before some detail, what brought this about? Well, with the launch of the UPH riflestock, which is a PRS/Tactical inspired ultralight precision hunting stock, we have spoken to a lot of hunters and entrants into long range shooting that are searching for a ballistic app and a Kestrel to go with their new stock to help them reach their rifles potential. If it can be afforded, the k5700 Elite with Link with its advanced Applied Ballistics engine and complete environmental suite is trusted by Military’s across the globe and is second to none, so an easy recommendation. It is regularly listed as one of the most important bits of gear for the professional long range shooter. Alas, for the average hunter or beginner, it can be a daunting piece of technology… so is there a cost effective alternative that can be used to learn with, while saving for the K5700? Also is the device one that won’t become superseded when the inevitable purchase of the 5700 Elite occurs? We say YES! It is the kestrel D3 Drop, perfect for velocity/temperature recording (throw it in the bucket of ice – it’s water proof!), and it provides the actual Density Altitude, Temperature and Humidity at the shooters exact location directly to the wonderful ballistics app, StrelokPRO. StrelokPro has the best holdover screen on the market and it is a high precision ballistics solver that we’ve verified to 2000m with similar accuracy to both Applied Ballistics (which does not connect to Kestrels if used as a phone/tablet based App, despite AB being the chosen engine in K5700’s, again w.t.f?!) and Ballistic AE (our old favourite for beginners but it is much too expensive).
So grab a Kestrel D3 Drop hook it to your backpack, download StrelokPro to the phone system most likely to be out with you while shooting (we use iOS) and follow this guide to get you up and running;
Setting up StrelokPRO
First thing is first, read the instructions (kidding). Once installed the easiest way to learn strelokPRO is to start with a rifle that uses factory ammo, reload everything? Well then dust off your .22LR/17HMR/22WMR as most factory selections for these wonderful rimfire cartridges are in StrelokPRO already. For this article we will be using our precision .22LR with its Bolly UPH stock running Norma training (no. 2) .22LR ammunition.
.22LR Build Specs (cause whenever a rifle image goes up we get asked)
- CZ455 Sporter
- Bolly UPH Gen2
- Limbsaver Classic
- 2x Flush Cups
- ISA 10 round Magazine
- BT34 Rail
- Atlas PSR BT46-LW17
- DIP 25MOA Rail
- Porter Machine Works Rings
- Athlon Ares 2.5-15×50 FFP MIL/MIL
- Rmoury 30mm Level
- Lowey Trigger Kit
As this rifle is a .22LR we zeroed the rifle at exactly 50m and set the zero stop with standard velocity target ammunition. This way our subsonic zero will have the zero stop at around 30-40m and our High velocity hunting ammunition will be zeroed at the more useful 65m (in our experience this is about perfect for fox whistling with a precision .22 or spending an afternoon sniping rabbits for the pot).
Once the turrets are back together and verification has occurred we boot up StrelokPRO and are greeted with this screen:
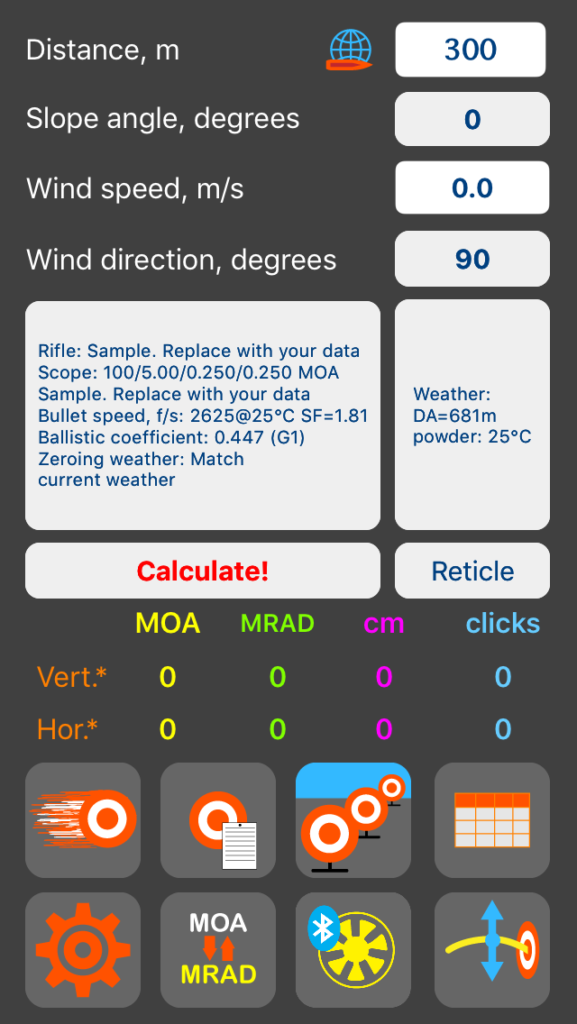
Now some values may be different to our screenshot at this point but it can be safely ignored, just go straight to the red gear in the bottom left corner, tap this button to access Strelok’s settings:
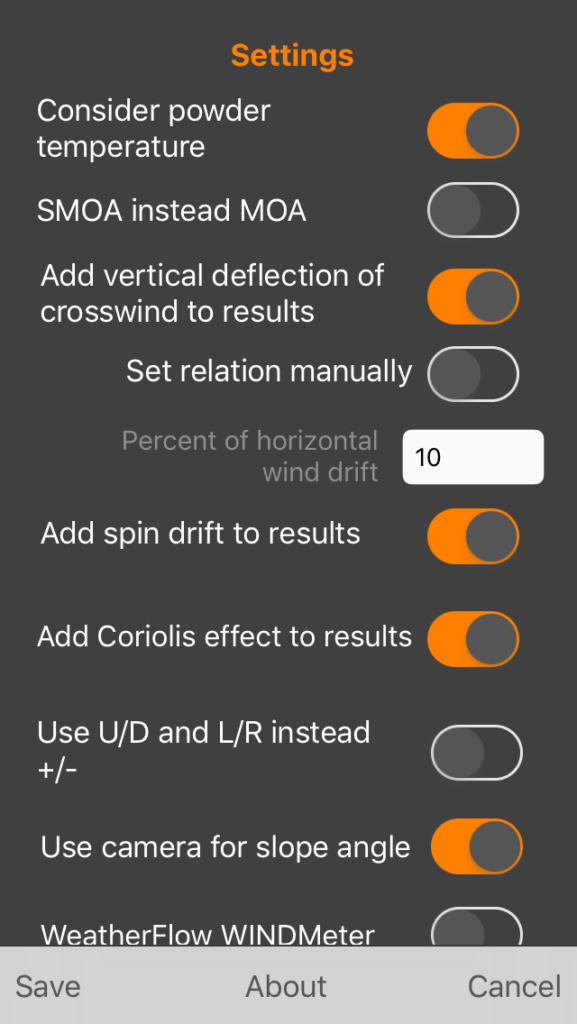
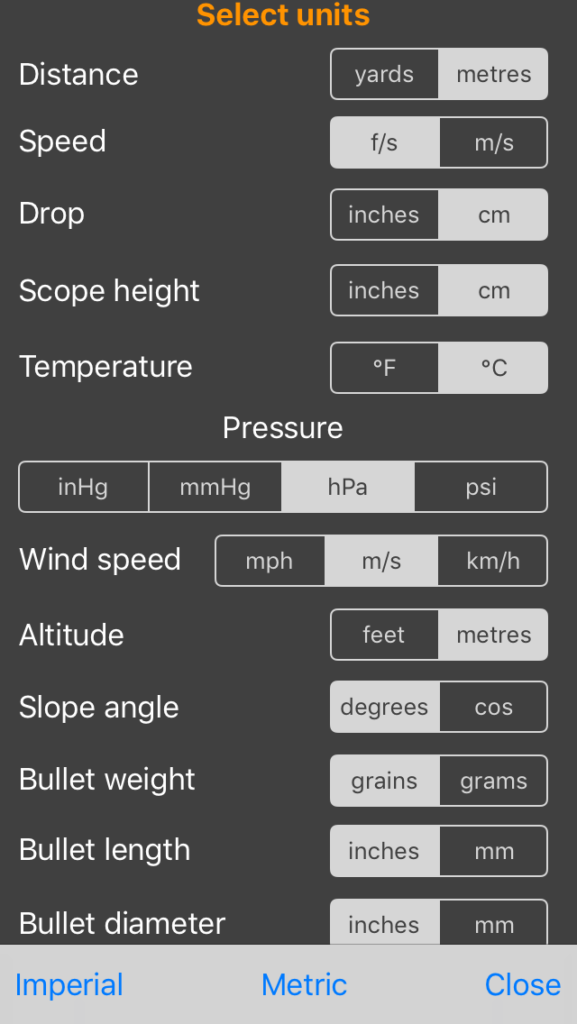
Now most of these features depend on personal preference but we run with these options pictured. Once you have the settings the way you like, tap save and scroll down to Measurement units and again, set them up how you like and hit close when done, our preferences are pictured:
Next up is to get the Drop and StrelokPRO talking, so still in the settings menu scroll down to Bluetooth devices and tap it to be greeted with the choice between weather stations and wind meters, make sure you clear any saved device ID’s when connecting to a new device in the future, e.g. your new K5700 when you get it. Scroll the top menu down to Kestrel Drop and tap done in the bottom right;

This will return you to the setting page again so save your settings by tapping ‘save in the bottom left corner and this will return you to the main screen. A couple icons to the right of the settings gear wheel button is image that is a button with a bluetooth symbol in the top left corner of a yellow fan from a K5700 unit. Tap this button and StrelokPRO will start looking for the nearest Drop (this is a good time to realise that you need the Drop to be on and the phone to have bluetooth on);
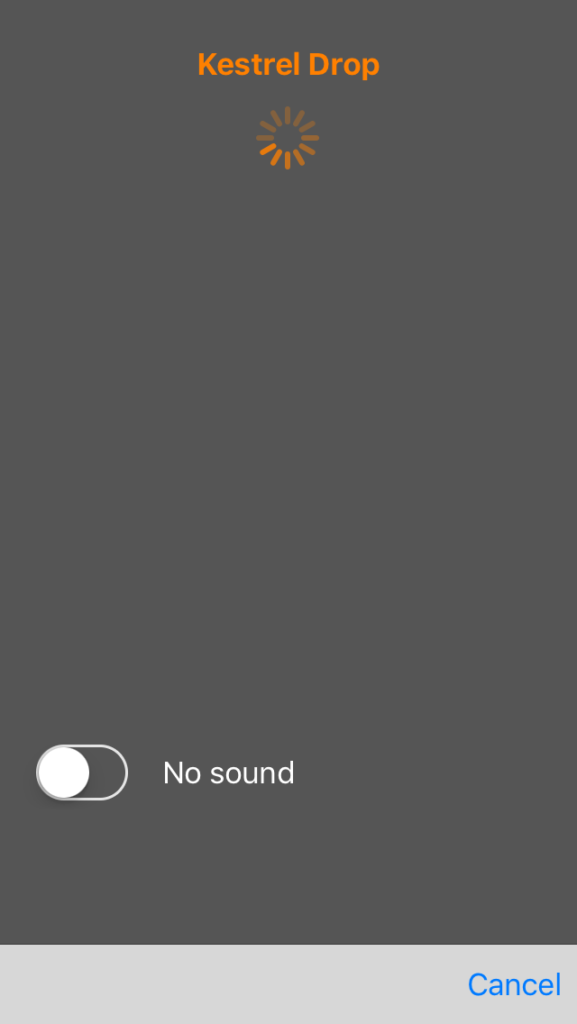
It should find the drop quickly and you will be asked to make this the priority weather device as so;
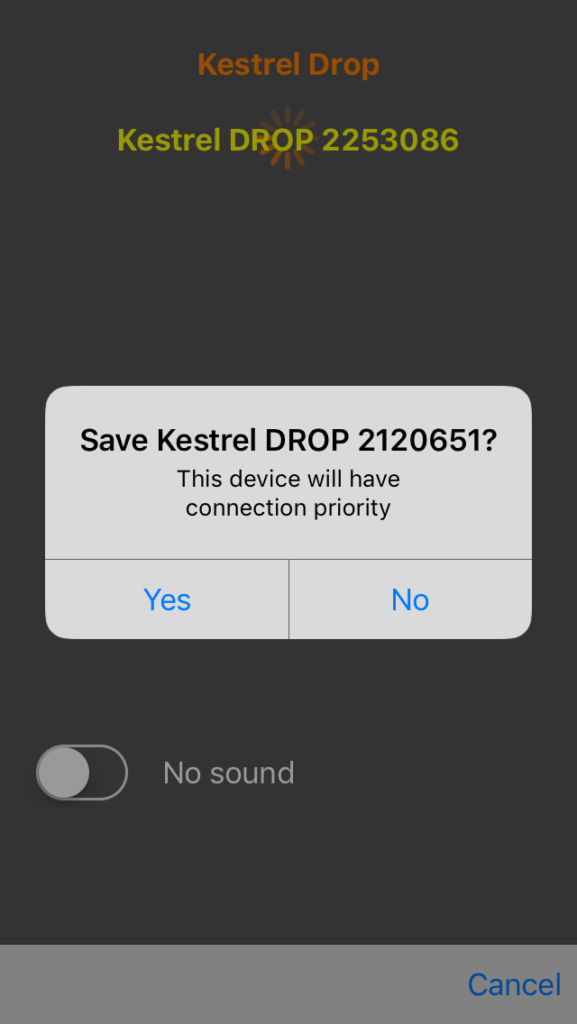
Hit yes and all the current environmentals will populate:
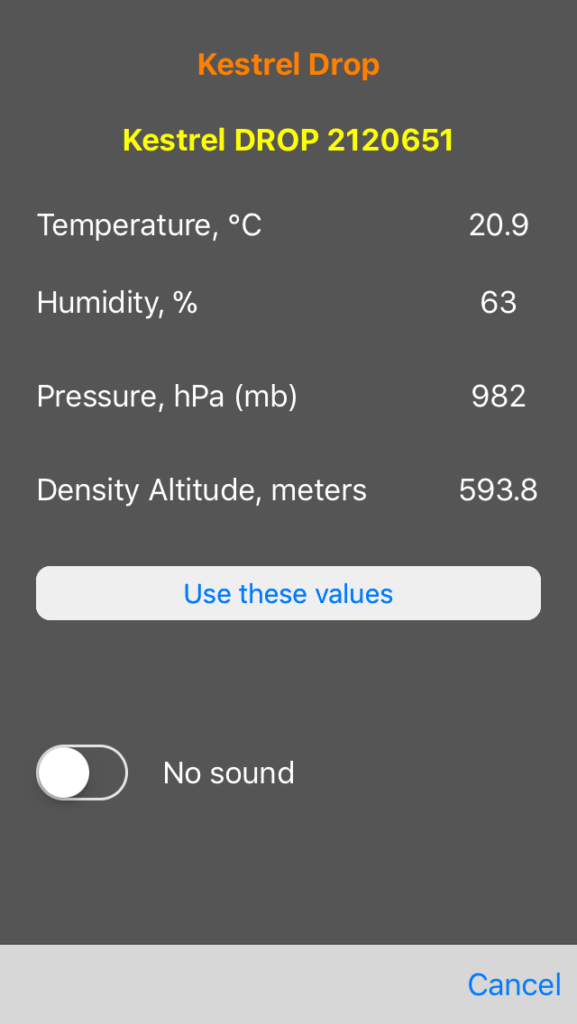
The key here is that Density Altitude reading, so to make sure StrelokPRO uses this measurement, tap “use these values” and you will be taken to the main screen, now you need to tap the white box circled in red:
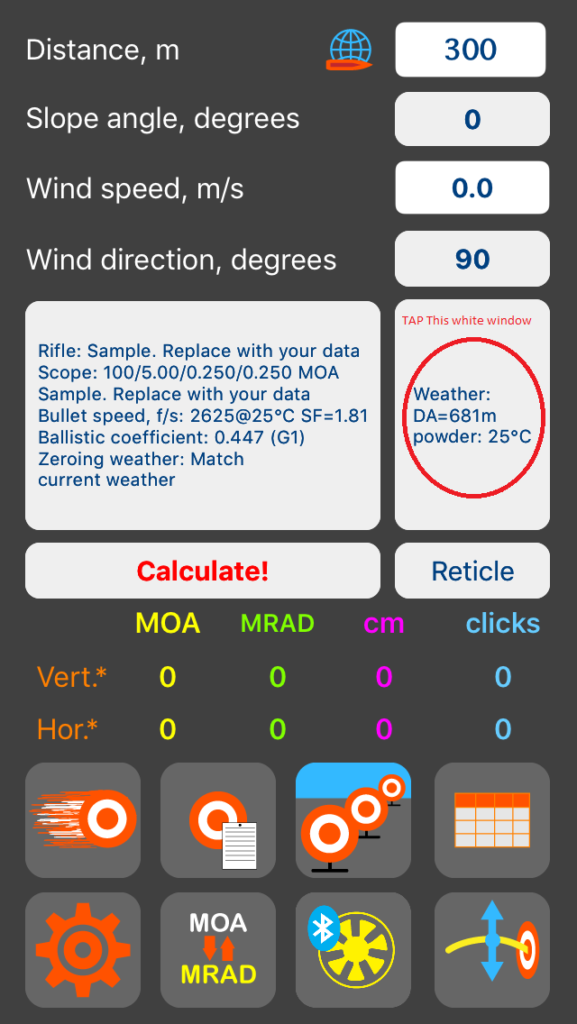
Now simply change the slider to make sure StrelokPRO uses Density Altitude;

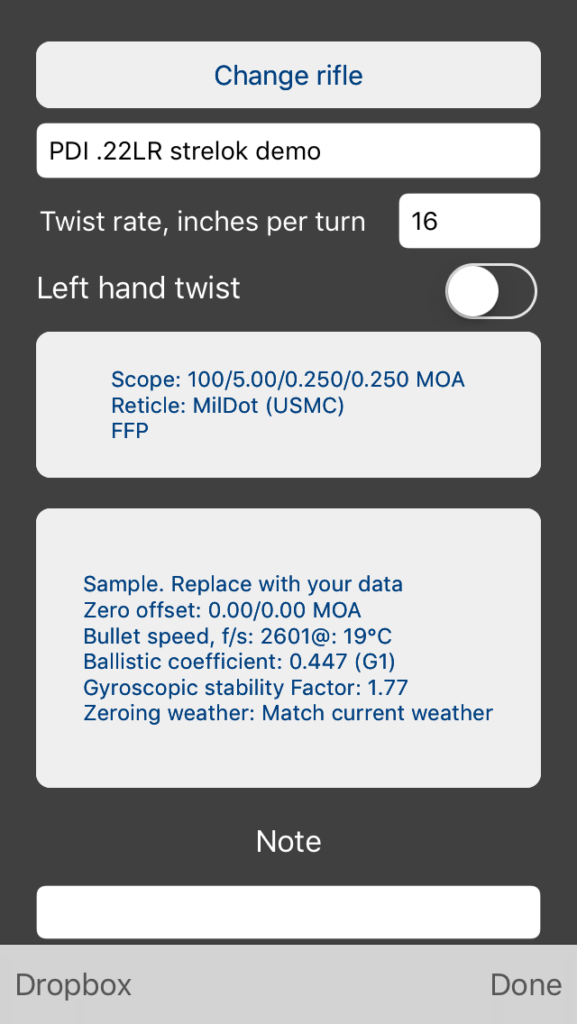
Congratulations! Your Drop and StrelokPRO ballistics solver are now paired! Next is putting the information you have about your rifle system into the solver so you need to tap the white box circled in Red:
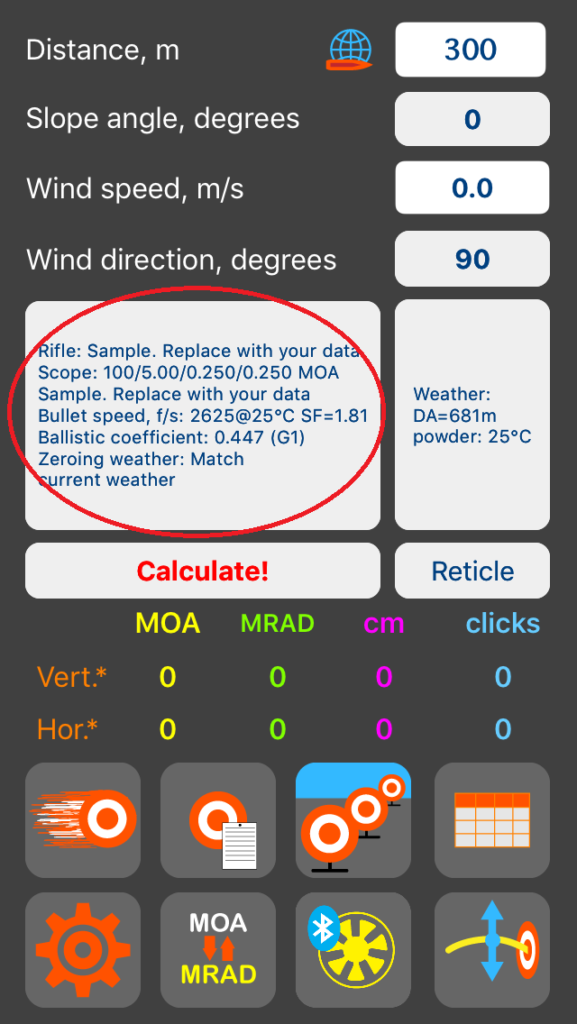
Tap the white box with “sample…” and rename this profile as you please, we have called it “PDI .22LR strelok demo”. We also input the rifle twist rate and in this case it is 1:16 so we just type in the number 16 after tapping the white box and then tapping the blue done button in the bottom right.
Next is one of StrelokPRO’s party tricks that make it stand out from the crowd, its scopes database; tap the white box with “scope…” which is just below the Left hand twist slider:
You are greated with the wonderful scope setup page so put in the zero distance of the rifle and chosen ammunition followed by the scope height. Re. scope height this is the distance from the centre axis of the scope to the centre axis of the barrel. Measuring the vertical distance from the centre of the windage turret to the centre of the bolt is an easy way to find Bore Height. Being accurate to within 1/4” or 0.5cm is all that is necessary. Now also tap the blue button to the right of where it states “scope click units” and change the click units to whatever your rifle scope is, in our case it is MIL so we select MRAD. Then change the click values from 0.25 to what your scopes actual click values are by tapping the little white boxes and hitting done once correctly changed each time, in our case our screen now looks like this:
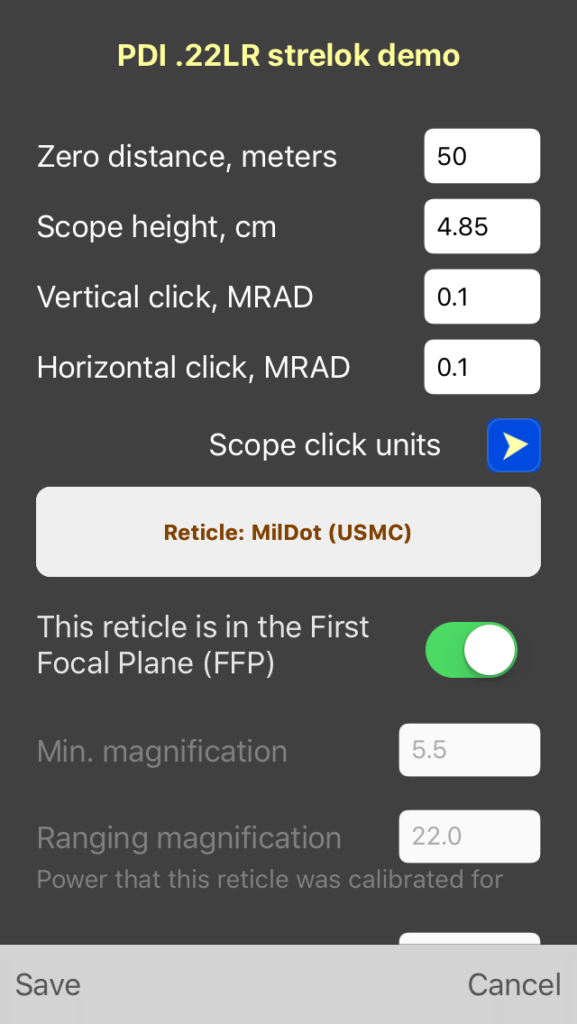
Its here, the party trick! tap the white box where Reticle: Mildot (USMC) is shown.
Now you have a massive list of scopes and reticles… so at the top is a search bar and we recommend searching by the scopes brand name, in our case “athlon” Yielding a much more manageable list where we find our exact scope and ret!
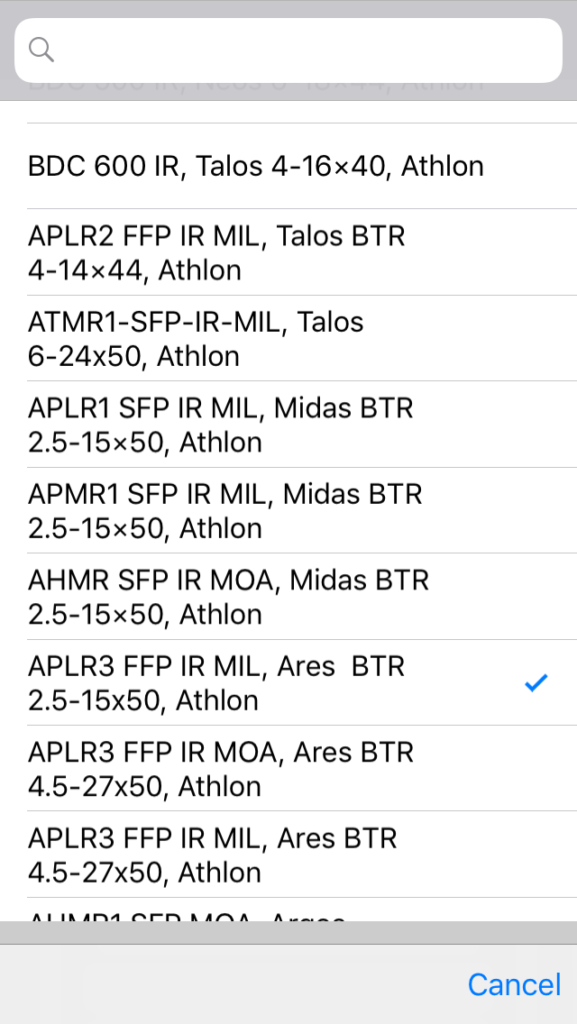
We Tap our scope and get brought back to the previous screen with the remainder of the scope details automatically filled!
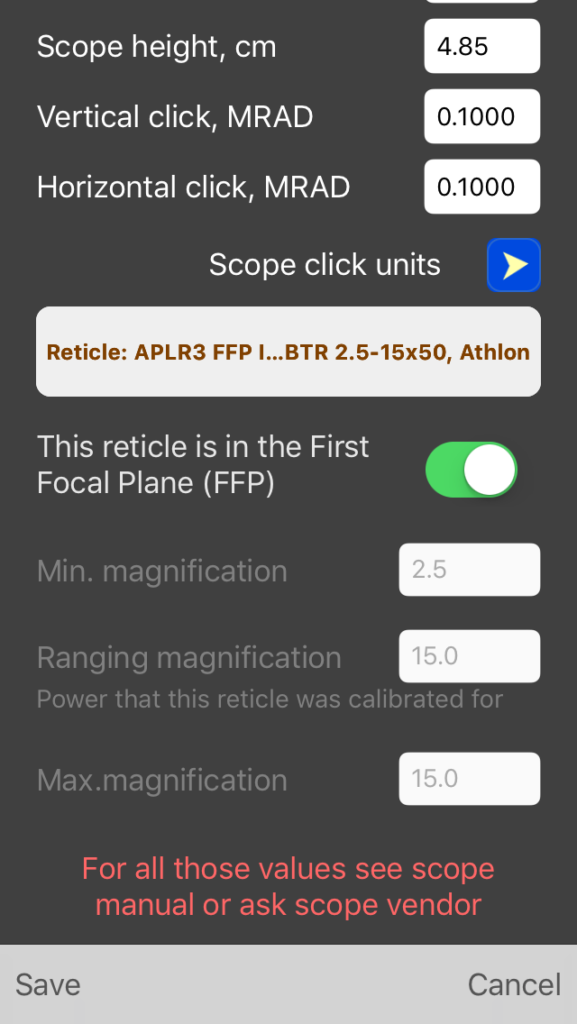
Now if by some very strange chance your scope isn’t listed, then the easiest method is to go to the manufacturer and select the closest scope you can, in some cases not all magnification ranges are listed but your ret is almost certainly there somewhere! If you need help finding a suitable equivalent, flick us an email and we will do our best to help you out!
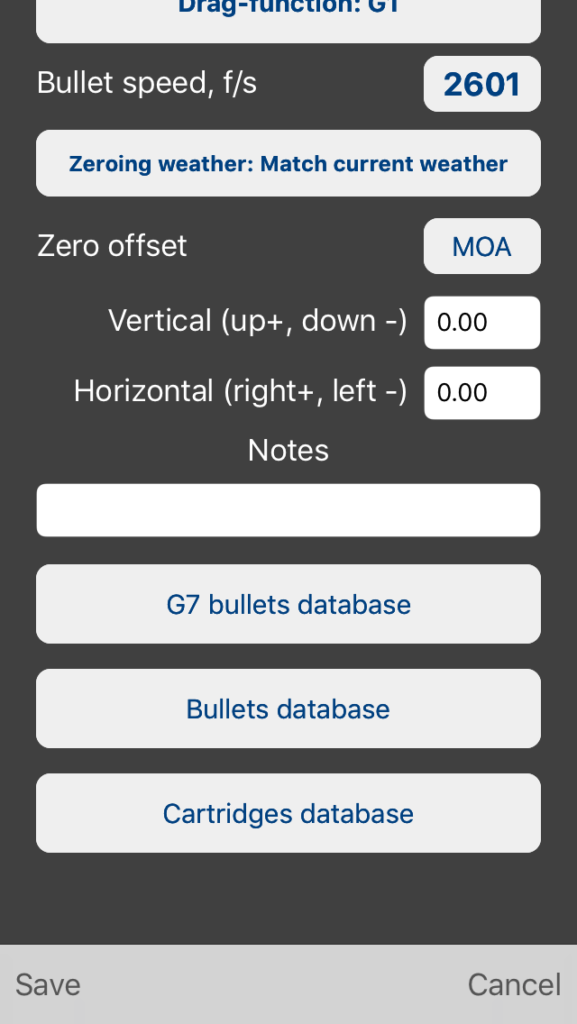
Tap save to ensure these values are stored with the rifle and we can move onto the ammunition. Tap the next white box below scope where it says “sample: replace with your data…”
Scroll down to reveal 3 choices: G7 Bullets database, Bullets Data Base and Cartridges Database. In our case we are going to be using .22LR factory ammunition, if you are using other ammunition chances are it is listed however if not, just like other Apps you can always use the bullet or G7 bullet databases and set muzzle velocities manually. But we selected Cartridges database:
Another giant database opens and we straight away change thje caliber and scroll this menu to .22LR. Then we tapped Vendor and scrolled to Norma. Giving us the final filtered options we are after;
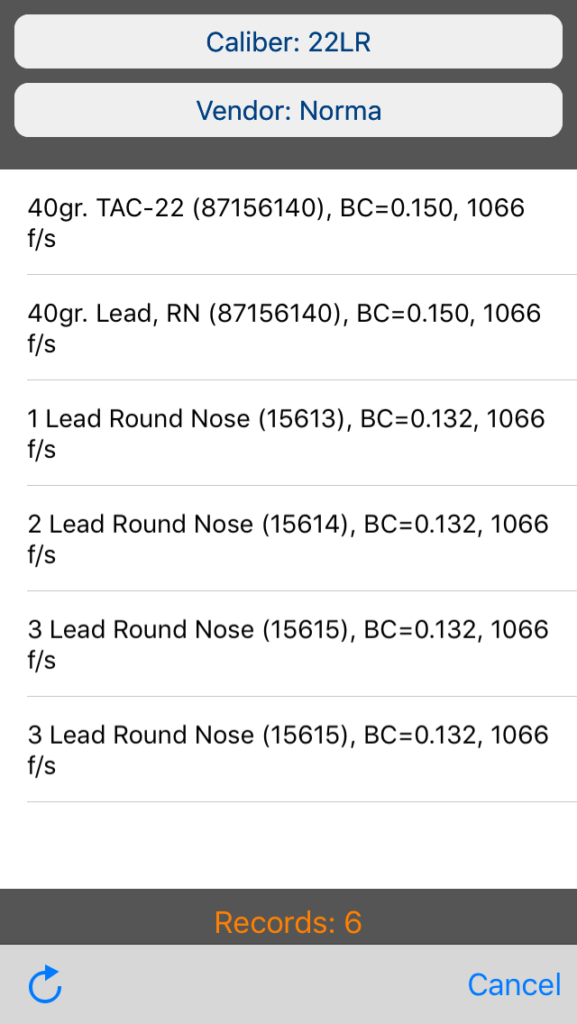
And there it is, our actual ammunition with even the correct part number; 2 Lead round nose (15614), BC = 0.132, 1066f/s. How easy is that!! so we Tap it and a confirmation appears;
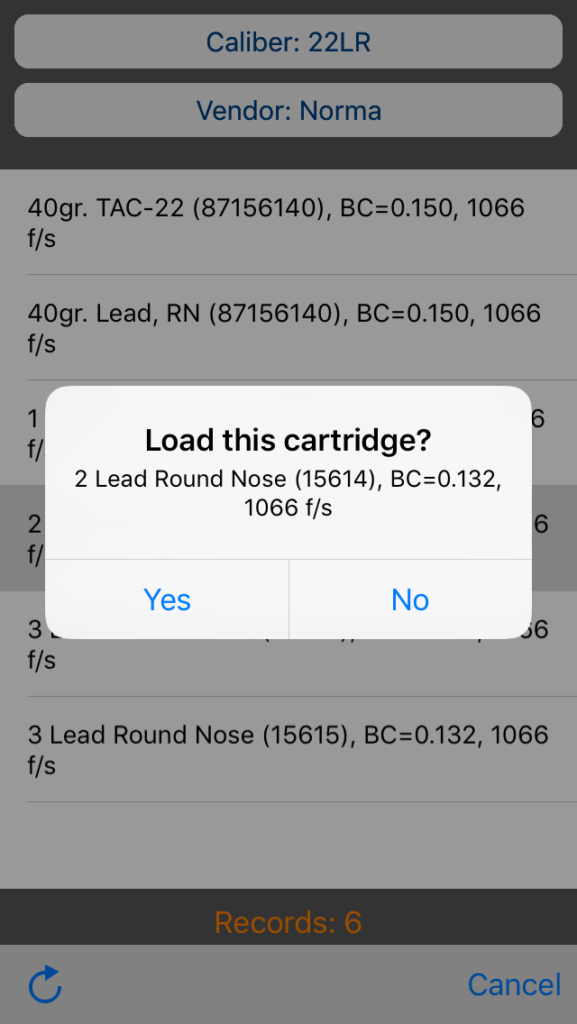
Tap Yes! and all other critical information populates! The only last thing worth checking is that Zeroing weather is enabled, so tap that zeroing weather box and enable it, then tap the Bluetooth/weather station indicator in the bottom right corner:
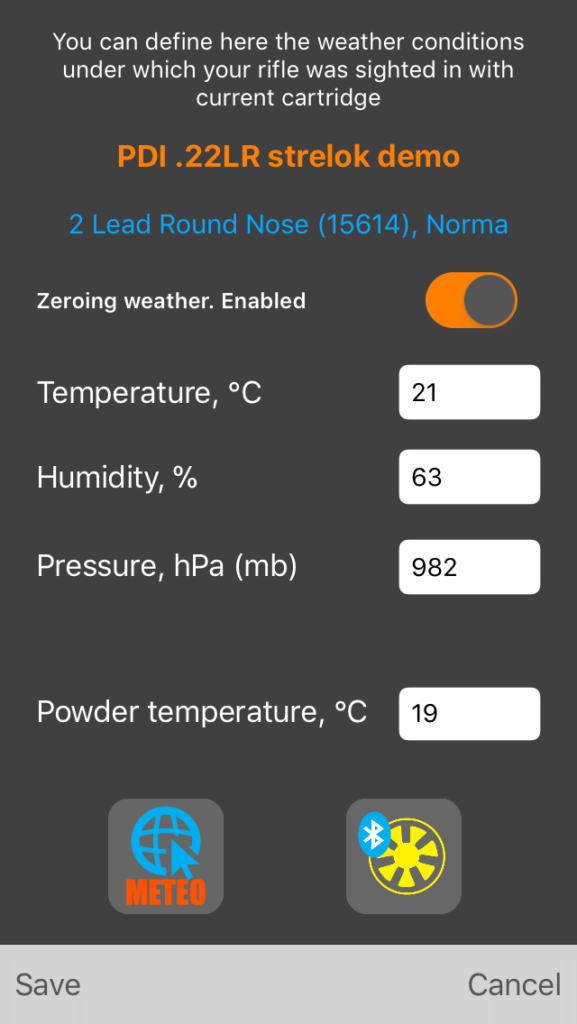
This will bring up a similar screen to before where you can tap the “use these values” button, then tap save. Another congratulations is in order, you have now taught StrelokPro what the EXACT weather you zeroed your rifle in is, a step many fail to do and it is of critical importance, so much so that many who make this mistake regularly blame the ballistics solver for incorrect output. Especially if they just use the weather that their local weather service, e.g. the bureau of meteorology, tells them for their approximate location, rather than utilising a precision weather station located exactly where they are zeroing their rifle! D3 Drop for the win!
Now its time to true that velocity as it will probably not be accurate for your current weather, so either use a chronograph to measure the actual mv (and enter this value) or you may use the truing function of StrelokPRO. So we are going to assume a chronograph isn’t handy, or it is an untrustworthy chronograph (a lot fall into this category!). So hit save/done to return to the main screen. Now as we are using subsonic ammunition we can true at any distance that gives enough information to do so, if we were using supersonic ammunition then it is important to true the muzzle velocity at a distance greater than our zero distance but less than the transonic region. You can determine the distance to transonic region by using the table solution shown later in the guide. For now, we are using ammunition with a mv below the speed of sound so we can apply PDI’s truing distance rule of thumb which is to true muzzle velocity data at a distance at least 4x our zero distance. In this case the rule of thumb yields 200m (for most centre fires it will be 400m and thankfully this is generally below the transonic region of most centre fire ammunition so is a pretty handy rule of thumb). But we were feeling cocky when writing this guide and went beyond the rule of thumb (perfectly acceptable) and set up a large target at 350m and got to work. First change the distance in strelokpro from whatever it currently is to the truing distance as so:
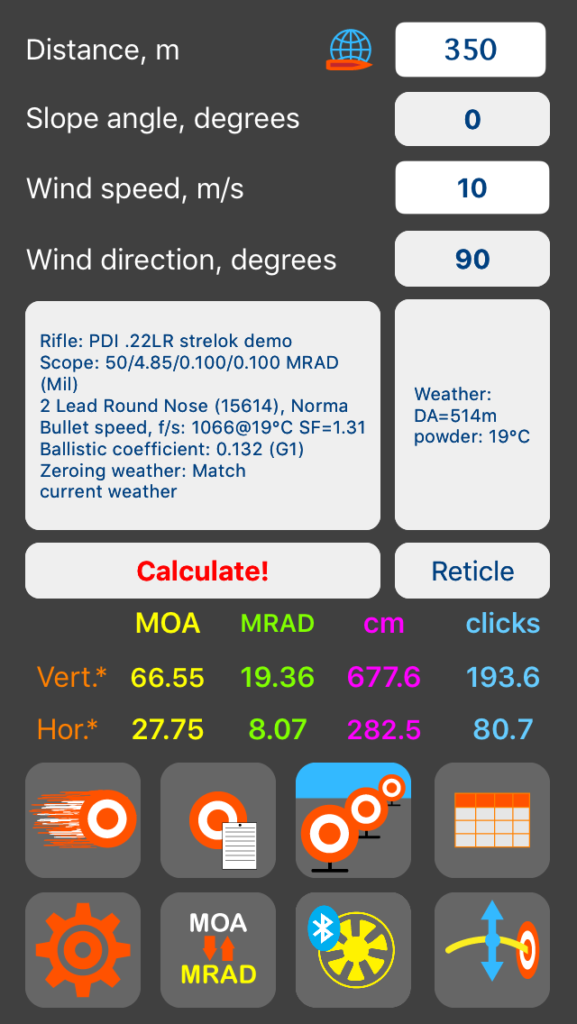
If there is wind, do your best to estimate it, or pick a day that isn’t windy (a common practice for zeroing a rifle is to do it really early in the morning or at an indoor range). Change the wind values as necessary (preferably zero) and then tap ‘Calculate!’. Dial the required amount shown, in our case it was a whopping 19.36MRAD. Then tap the icon in the bottom left of the screen, with a curve hitting a target and unidirectional arrow representing the movement of this curve up or down…. this is a very important button as it is the truing button of StrelokPRO, the next screen is as follows:
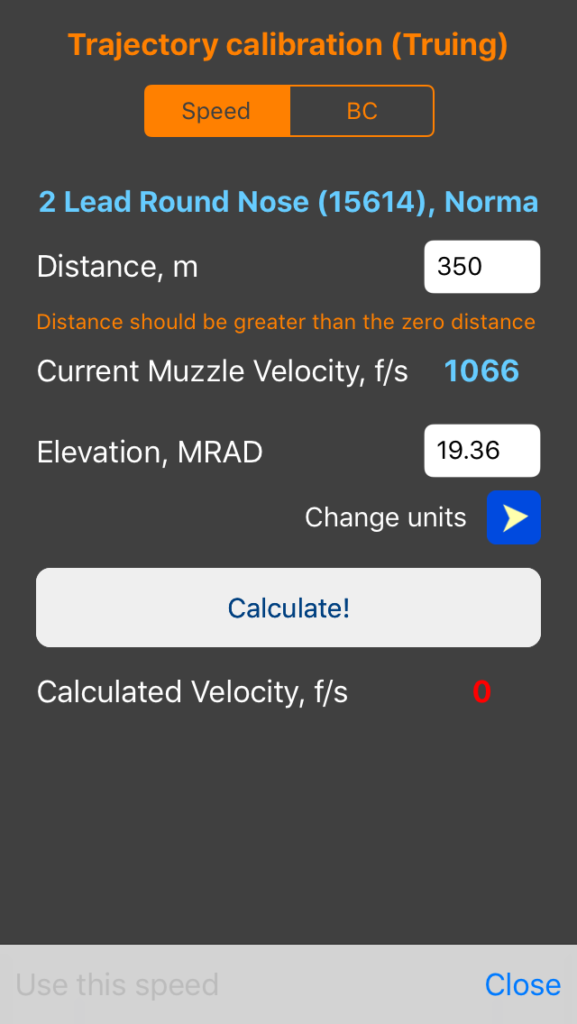
Now, check you have dialed the correct amount (in our case 19.36MRAD) and aim for the centre of the target and shoot a 5-10 round group at the same point of aim. Then use your ret or whatever means necessary to measure how far (in elevation only) the group’s centre is from the point of aim. In our case it was a touch over 0.4MIL below our point of aim but just less than 0.45MIL. So we dialled the additional amount of 0.44MIL bringing our total dial to 19.8MIL (MIL is also known as MRAD by the way). We then fired another 10 shot group and were pleased to see the centre of the 10 shot group was at our point of aim. We then tap the “Elevation, MRAD” box and change it to the amnount we dialed of 19.8MIL. We then hit calculate! to generate the following velocity correction for our exact weather (thanks to the data from the drop):
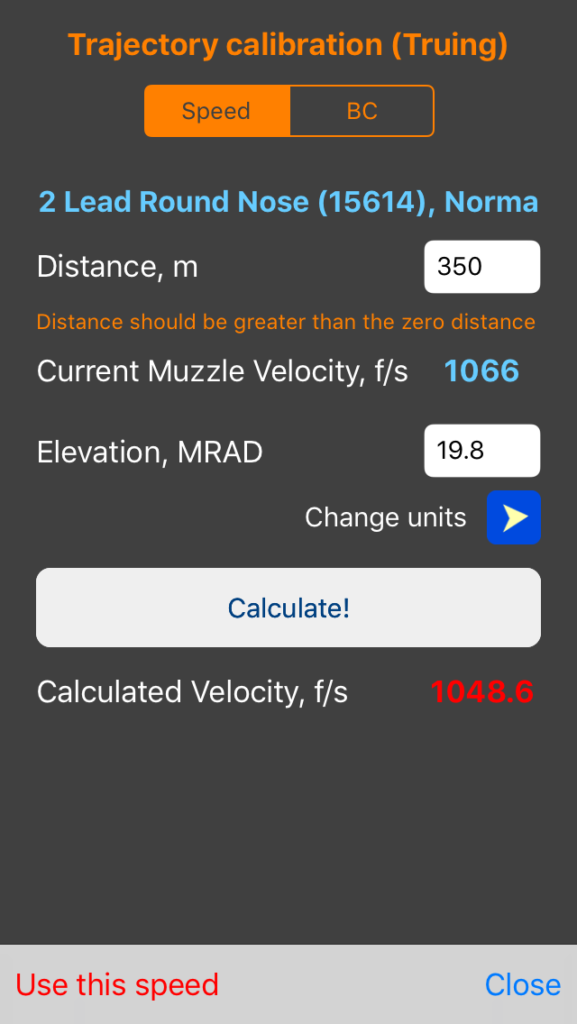
We then tap “use this speed” updating StrelokPRO with our actual MV for our actual current zeroing conditions. Again, Congratulations! Your fantastic StrelokPRO Kestrel Drop combo is now set up for your rim fire enabling you to test it out and cheaply learn your way around the system all while getting that always necessary practice in! How awesome is this!
Using StrelokPRO for holdovers:
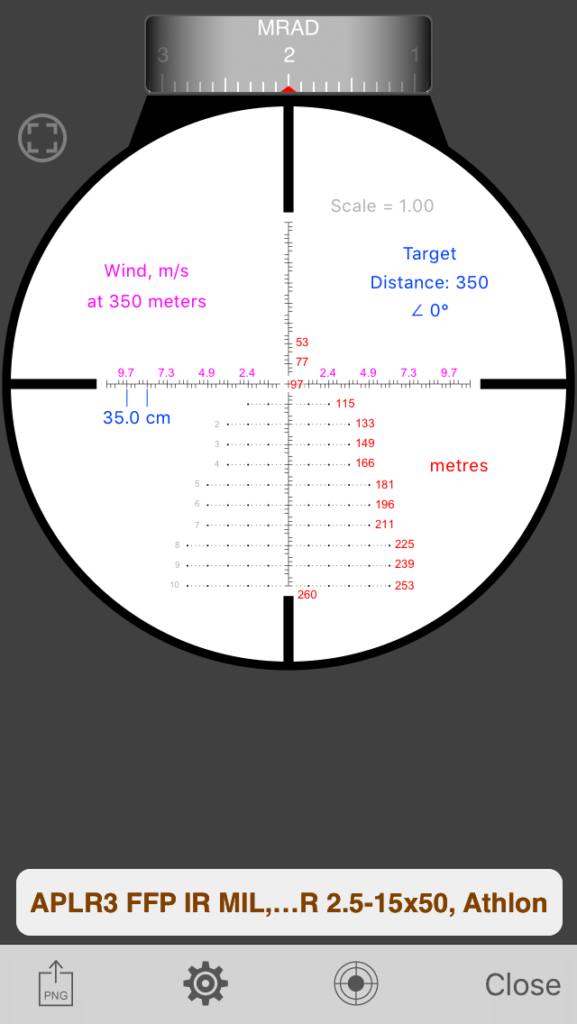
From here we reccomended mucking around with every button and learning what is possible and what changes what. But to get the basics out there; you can now press the reticle button which in our case brought up the following:

The red numbers are elevation holdover points while blue is wind speed. This can be exported as an image for printing, you can modify settings and even choose a target and get it placed on the image to give you pricese holdover locations. But this is all better learned with doing yourself so we will leave it upto you and bring your attention only to the dial at the top. This dial represents your elevation turret, by spinning this turret to a known value, eg 2 MRAD the reticle will repopulate the holdovbers to what they would be if you had in fact dialed 2 MRAD. This is fantastic for competition or when out hunting e.g. when we dial 2MRAD our centre cross hair now represents 97m which can be very handy for stages with targets at 100m followed by another target at 150m as we can see what our holdover will be without having to dial the correction:
Using StrelokPRO for Ballistic Charts:
Just above the Truing functions button is the Tables button, tap this to bring up the charting/table system, yielding the following in our case:
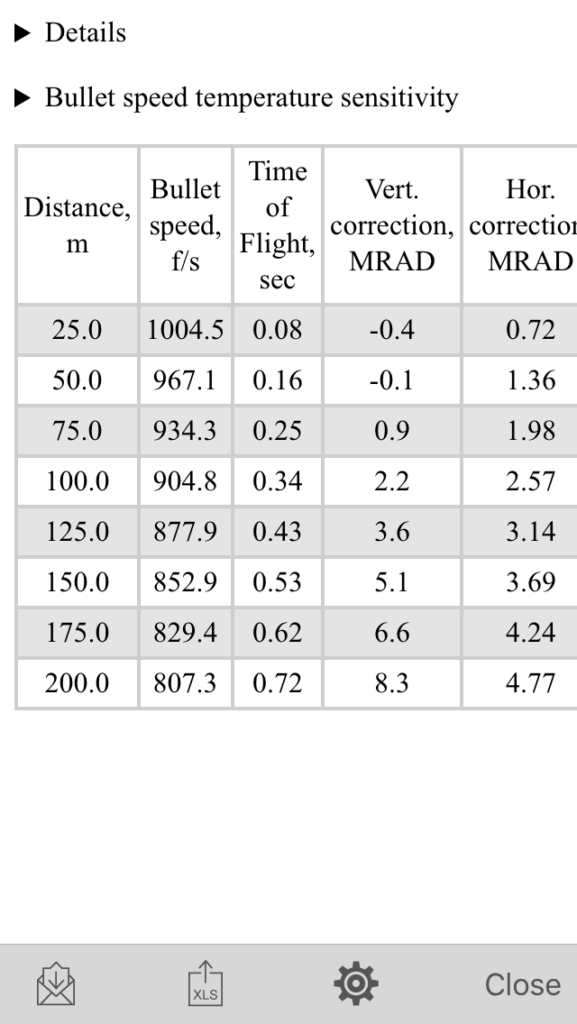
For targets/PRS etc, we suggest tapping the gear/setting button at the bottom just left of the close button and changing them to the following:
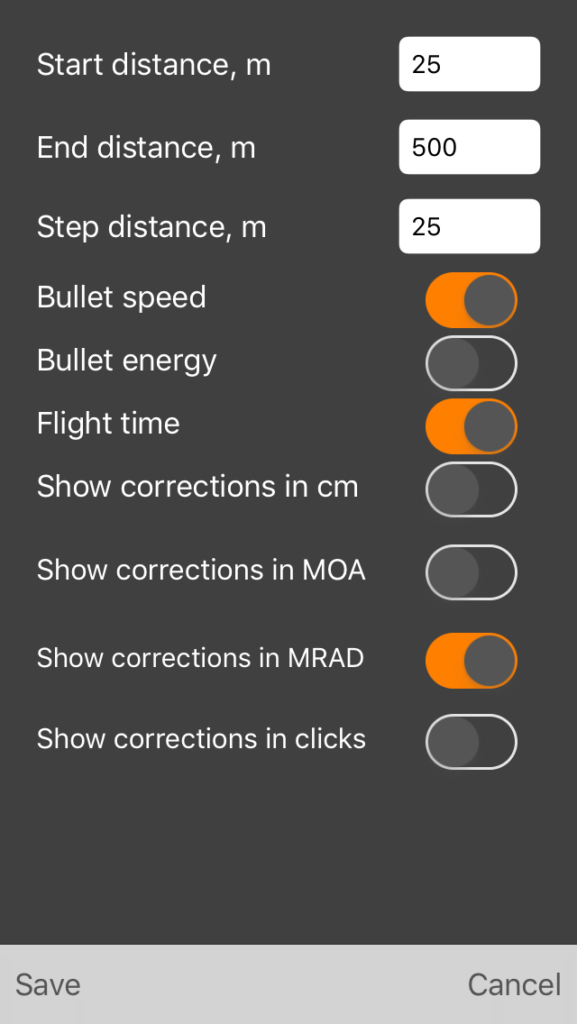
Bullet speed will be shown to be red if it goes from supersonic to subsonic, take this distance and x0.9 for the approximate distance to the transonic region.
For hunters we recommend switching off bullet speed and putting energy on as this is how you can establish your max hunting distance with your ammunition.
Now modify the values on the table as necessary. ENJOY!!!!!
If we get feedback/requests we will update this guide so send questions etc to [email protected]
And yes, there will be a part two and we will delve into BC truing /custom curves and Velocity vs Temperature setup (this is were the Drop really shines even if you have the K5700 Elite!!!)